
Pediatric Central Line Care: A Parent's Complete Guide

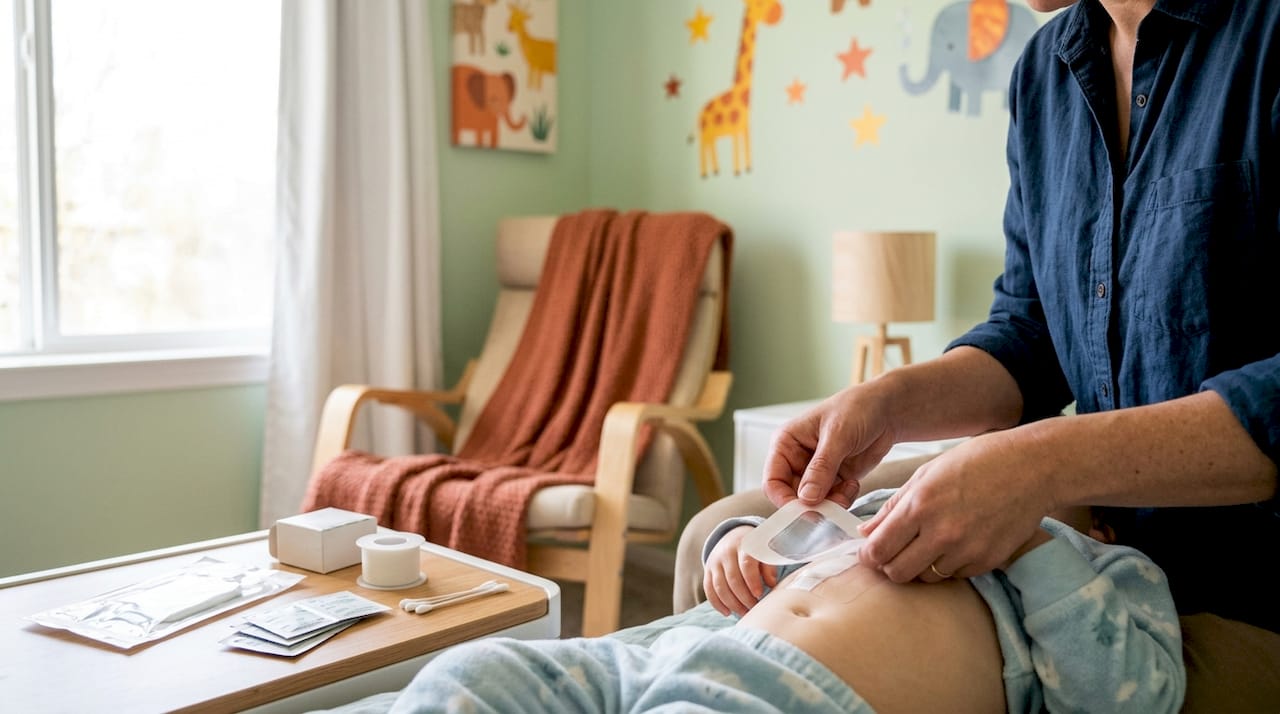
Every parent managing a child’s central line needs to do three things without exception: wash your hands thoroughly before touching anything near the line, use the exact aseptic technique your clinical team demonstrated, and keep an emergency kit with written contact numbers within arm’s reach at all times.
Those three habits cover the majority of preventable complications. The rest of this guide walks you through every step in between.
Start here if your child just came home with a line:
Wash hands for at least 20 seconds with soap and water (or use alcohol-based sanitizer) before any line contact. Gloves do not replace hand hygiene.
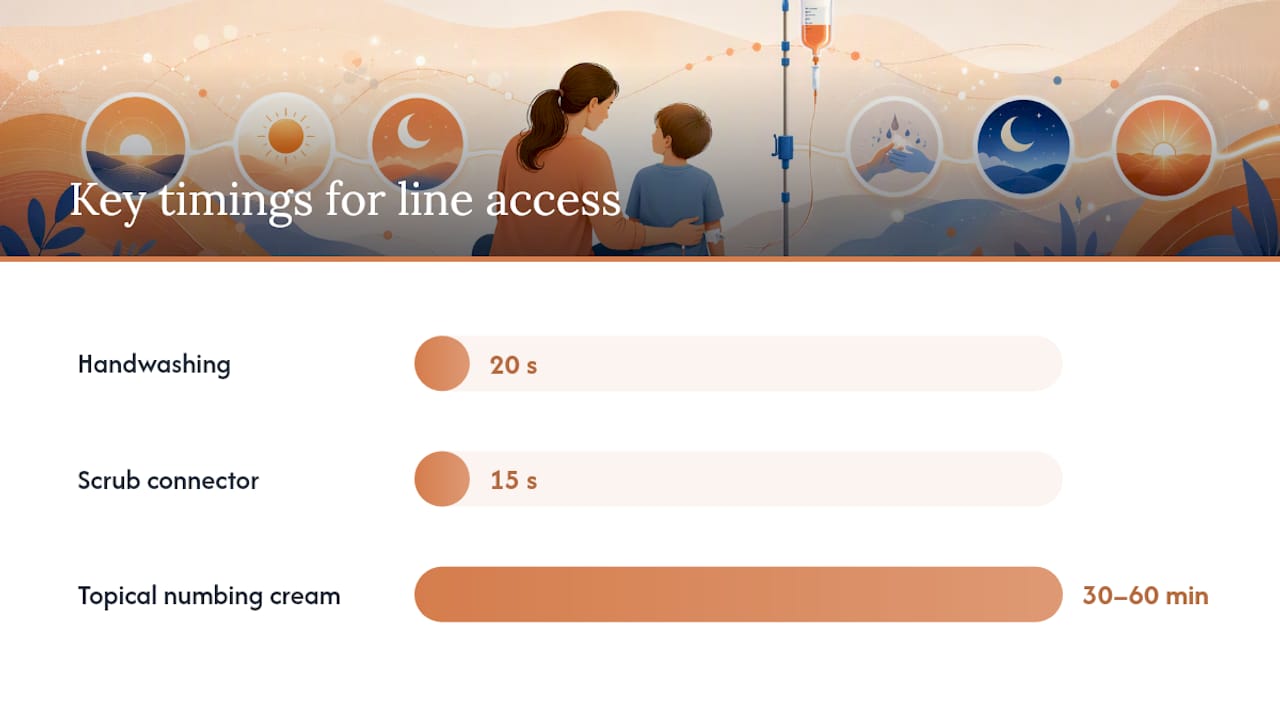
Scrub the cap (needleless connector) vigorously with a chlorhexidine (CHG) wipe for 15 seconds before every access. Let it dry completely.
Secure the line loop under the dressing so it cannot snag on clothing or bedding.
Know where your clamp is. Practice using it before you need it.
Post your home-care nurse’s number, the clinic’s after-hours line, and 911 on the refrigerator.
Call 911 immediately if your child has uncontrolled bleeding from the line site, visible air bubbles in the tubing, sudden severe breathing difficulty, or becomes unresponsive. For fever above 100.4°F, chills, a cap that has fallen off, or a line that appears cracked or leaking, clamp the line and call your home-care team or clinic right away. Do not wait to see if symptoms resolve on their own.
Key Takeaways
Safe pediatric central line care at home depends on consistent hand hygiene, aseptic technique, weekly dressing changes, and knowing exactly when to clamp, call, or go to the emergency department.
Point | Details |
Hand hygiene first | Wash hands before every line contact; gloves do not replace this step. |
Scrub the hub every time | Use a CHG or alcohol wipe for 15 seconds of friction before every access; let it dry fully. |
Weekly dressing changes | Change the dressing every 7 days, or immediately if loose, wet, or soiled. |
Know the emergency signs | Fever above 100.4°F, chills, lethargy, or visible line damage require an immediate call or ED visit. |
Opulentprivatecare for Georgia families | In-home pediatric nurses provide dressing support, caregiver retraining, and GAPP paperwork assistance statewide. |
Table of Contents
Daily care and safe line access: step-by-step home procedures
Flushing, locking, and blood-draw basics parents must follow
Preventing infection and recognizing CLABSI: what to watch for
Common problems and emergency actions: step-by-step responses
Becoming confident: training, competency checks, and documentation
When the line is removed and what long-term management looks like
What the guidelines say: CDC, APIC, SHEA, and AHRQ recommendations
What caregivers actually go through, and why practice is the answer
Opulentprivatecare: in-home pediatric nursing for central line families in Georgia
What type of central line does my child have?
Knowing your child’s specific line type changes what you do every day. Here is a quick breakdown of the four most common types in pediatric care.
PICC (Peripherally Inserted Central Catheter): Inserted through a vein in the arm and threaded to a large central vein near the heart. PICCs are common for shorter-term IV therapy (weeks to a few months). The exit site is on the upper arm, and the dressing is changed weekly or sooner if wet or loose.
Tunneled CVC (Broviac or Hickman catheter): Surgically placed under the skin and exits through the chest wall. These are designed for long-term use (months to years). They have one or more lumens and a visible external portion that must be secured and protected daily.
Implanted port (Port-a-Cath): Sits entirely under the skin with no external tubing when not in use. A nurse or trained provider accesses it with a special needle (Huber needle) through the skin. Ports require less daily maintenance but still need regular flushing.
Umbilical lines (UAC/UVC): Used in newborns in the NICU through the umbilical cord vessels. These are hospital-managed and typically removed before discharge, so home care is rarely required.
Practical differences that matter at home: PICCs and tunneled CVCs need weekly dressing changes and daily or scheduled flushes. Ports only need flushing once a month when not in use (or per your team’s order). Blood draws are possible through most tunneled CVCs and PICCs; ports require needle access first. Ask your team specifically whether your child’s line is approved for blood draws before attempting one.
Pro Tip: Tape a small index card to the refrigerator listing your child’s line type, number of lumens, the flush solution and volume ordered, and the clinic’s emergency number. Babysitters, grandparents, and school nurses will thank you.
What to expect before discharge and who must train you
Leaving the hospital with a central line is not something that happens without preparation. Your clinical team is required to walk you through every skill before your child goes home, and you should not leave until you feel genuinely confident, not just “okay enough.”
Before discharge, the team must cover:
A live return demonstration of dressing changes, performed by you, watched by the nurse
Flushing and locking the line, including the correct syringe size and solution
How to scrub the hub and access the line safely
What to do in an emergency (clamp, call, 911 criteria)
Written instructions you can reference at home, not just verbal explanations
A supply list and confirmation of your first home-care pharmacy order
Who does what: The hospital nurse teaches the initial skills. A home-care nurse (if ordered) reinforces those skills at home and can perform dressing changes independently. Your job as the family caregiver is to perform or supervise daily care, document each access, and call the team when anything looks or feels off.
Timeline to plan for: The first dressing change typically happens 24 hours after line placement, then weekly after that. Your first clinic follow-up is usually within one week of discharge. Before you leave the hospital, confirm the date of your first home-care nurse visit, where to pick up or receive supplies, and which pharmacy will handle your home IV medications or flush supplies.
Programs like Team LINE at Dana-Farber/Boston Children’s are designed to help families practice central line care before discharge. These coaching models are meant to supplement your clinical teaching, not replace it. Ask your team if a similar structured practice program is available at your hospital.
Daily care and safe line access: step-by-step home procedures
The order you follow matters as much as the steps themselves. Skipping or reversing steps is how contamination happens.
The correct sequence every time:
Clear and wipe down your work surface with a disinfectant wipe. Let it dry.
Gather all supplies before touching the line (syringes, flush solution, CHG wipes, gloves, new cap if needed).
Wash hands for 20 seconds with soap and water, or apply alcohol-based sanitizer and rub until dry.
Put on clean (non-sterile) gloves.
Scrub the needleless connector (cap) with a CHG wipe using firm friction for 15 seconds. Let it air-dry completely. Do not blow on it or fan it.
Attach the syringe using the technique your team demonstrated (usually a push-and-twist motion).
Flush using the push-and-pause method: push 1–2 mL, pause briefly, push again, repeat until the full volume is delivered.
Clamp the line (if your line has a clamp) while maintaining positive pressure on the last push.
Remove the syringe and attach a new cap if required by your team’s protocol.
Secure the line loop under the dressing or with medical tape so there is no tension on the exit site.
Syringe size matters. Always use a 10 mL syringe or larger. Smaller syringes generate higher internal pressure and can damage the catheter or force a clot into the bloodstream. This is one of the most commonly overlooked rules at home.
Documenting each access: Write down the date, time, who performed the care, the flush volume used, and any observations (redness, resistance, leakage). A simple notebook works. This log becomes critical if a complication develops and the team needs to reconstruct what happened.
From Cincinnati Children’s central line care guidance: Parents should be active partners in care — practicing return demonstrations, keeping an emergency kit stocked, securing the line loop under the dressing, and knowing exactly when to call for help.
Pro Tip: Ask your nurse to take a photo of the correctly dressed and secured line before discharge. Keep it on your phone. When you are unsure whether the dressing looks right, you have a reference point.
For children who find line access distressing, atraumatic care techniques such as topical numbing cream (EMLA or LMX4, applied 30–60 minutes before access), distraction with a tablet or favorite toy, and positioning the child in a comfortable, familiar spot can meaningfully reduce anxiety and resistance over time.
How to do dressing changes and keep the exit site clean
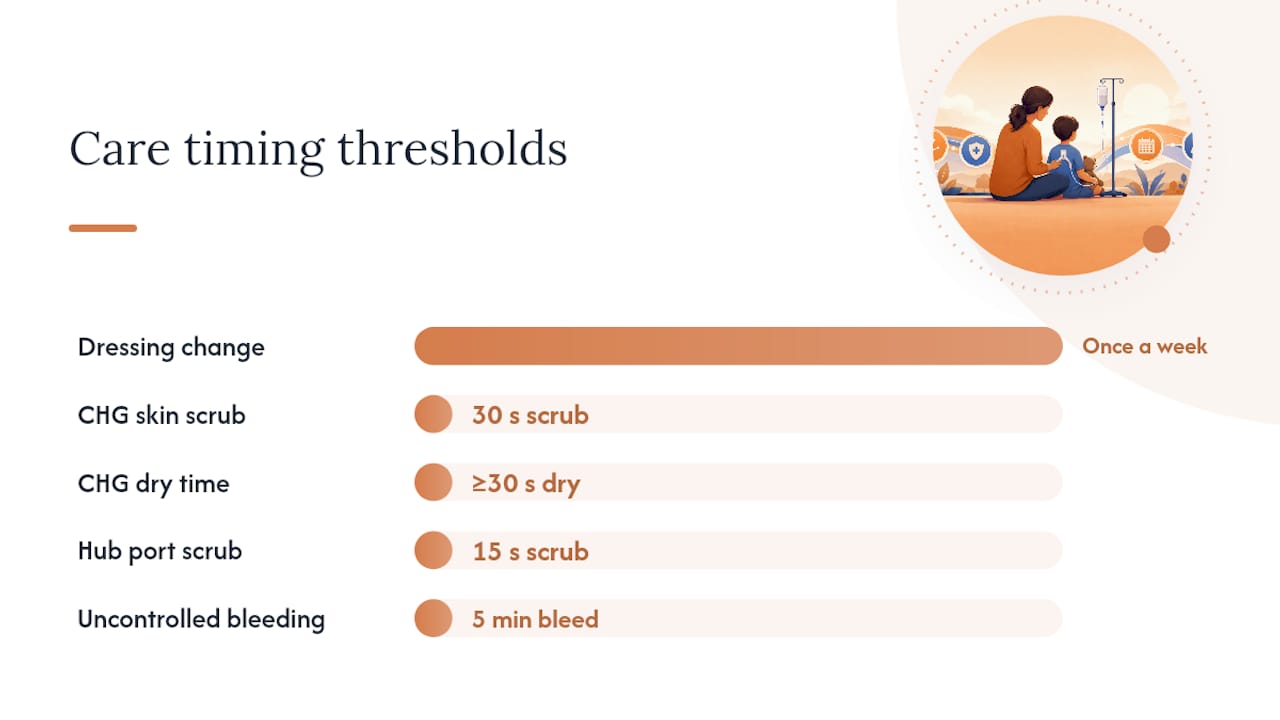
Change the dressing once a week, or sooner if it is loose, wet, soiled, or lifting at the edges. A compromised dressing is a contamination risk, not a “wait until the scheduled day” situation.
Step-by-step dressing change:
Prepare your supplies: CHG applicator or CHG wipes (per your team’s protocol), sterile gauze, transparent dressing (such as Tegaderm), securement device if used, clean gloves, and a mask.
Wash hands thoroughly. Put on a mask and clean gloves.
Remove the old dressing by peeling edges toward the exit site, not away from it. Pull slowly to avoid tugging the catheter.
Inspect the exit site carefully. Look for redness, swelling, drainage, or any change in the catheter’s position or length.
Clean the skin using a CHG applicator with a back-and-forth scrubbing motion for 30 seconds, then let it dry completely (at least 30 seconds, longer for infants). Do not wipe it off.
Apply the new transparent dressing, starting at the exit site and smoothing outward to eliminate air pockets.
Secure the catheter loop under the dressing or with a securement strip so there is no tension on the exit site.
Label the dressing with the date and your initials.
Needleless connector (hub) care: The AHRQ best-practice guidance recommends cleaning injection ports with 70% isopropyl alcohol or a CHG-alcohol wipe before every access. Scrub for 15 seconds using friction, not a light swipe. Allow it to air-dry before connecting anything.
Stop and call the clinic if: the exit site has increasing redness spreading outward, purulent (thick, colored) drainage, the dressing will not adhere because of excessive moisture or skin breakdown, or the catheter appears to have moved in or out of the exit site compared to its normal position.
Warning signs that cannot wait for a scheduled appointment:
Bleeding that does not stop with gentle pressure after 5 minutes
Skin that is blistering or breaking down under the dressing
The catheter feels loose or has visibly shifted position
Flushing, locking, and blood-draw basics parents must follow
Flush before and after every access, and use the push-and-pause method every time. That single habit prevents the majority of line occlusions seen at home.
How flushing works by age and line type: Your team will give you a specific volume and solution. In general, younger and smaller children use smaller flush volumes, but the syringe size rule (10 mL or larger) does not change with age. The Children’s Minnesota home-care guide specifies that flush frequency varies by age and weight, and that the push-and-pause method should be used consistently regardless of line type.
Flushing and locking rules:
Always use normal saline (0.9% sodium chloride) to flush unless your team has ordered heparin
Use heparin lock solution only when specifically ordered and at the concentration your team specifies (usually 10 units/mL for pediatric patients, but confirm with your team)
Flush before giving any medication, between incompatible medications, and after the final medication or infusion
For lines not in daily use, flush and lock on the schedule your team provides (often every 24 hours for PICCs, less frequently for ports)
Antimicrobial lock therapy may be considered for children with recurrent CLABSI on long-term lines; this is a clinical decision, not a home-care modification you make independently
Troubleshooting occlusion (line that will not flush):
Check that all clamps on the line are open.
Check the tubing for kinks or compression under clothing or the child’s body.
Ask the child to change position (raise an arm, take a deep breath, sit up).
If resistance persists, do not force the flush. Forcing can rupture the catheter or dislodge a clot.
Call your home-care nurse or clinic. They may order tissue plasminogen activator (tPA, such as Cathflo Activase) to dissolve a fibrin clot. This is administered by a nurse, not at home without instruction.
Blood draws: If your child’s line is approved for blood draws, your team will demonstrate the discard-and-draw technique. Never attempt a blood draw through a line that has not been cleared for that use, and always flush immediately after to prevent clotting in the lumen.
Preventing infection and recognizing CLABSI: what to watch for
Strict hand hygiene and aseptic technique are the most powerful tools you have against central line-associated bloodstream infection. No supply, no device, and no medication substitutes for doing those two things correctly every single time.
CLABSIs occur when bacteria or fungi enter the bloodstream through the catheter. They are serious, but they are largely preventable. Care bundles combining consistent maintenance practices with regular feedback have been shown to reduce CLABSI rates in pediatric patients, which is exactly why your team gives you a checklist rather than loose verbal instructions.
Prevention checklist for home caregivers:
Wash hands before every line contact, every time, without exception
Scrub the hub for 15 seconds with a CHG or alcohol wipe; let it dry before connecting
Keep the dressing dry and intact; cover the line site during bathing
Avoid submerging the line in water (no swimming, no baths that cover the site)
Do not touch the sterile end of a syringe or the inside of a cap
Change the needleless connector on schedule and whenever it is visibly soiled
Review with your team whether the line is still needed at each clinic visit
A critical warning most parents do not expect: CLABSI can develop without any visible redness or drainage at the exit site. Unexplained fever above 100.4°F, sudden chills, unusual lethargy, or a child who is simply “not acting right” are red flags for a possible bloodstream infection. Call your care team immediately — do not wait for a visible wound sign.
When to go to the emergency department: Fever with a central line in place is a medical emergency until proven otherwise. Most pediatric centers will direct you to the ED for blood cultures and IV antibiotics rather than a clinic visit. Know your team’s specific protocol before you need it.
Common problems and emergency actions: step-by-step responses
Clamp the line and call if you see tubing that is torn, cracked, or leaking; a cap that has fallen off; or any uncontrolled bleeding. Those three scenarios share one first step: clamp first, then assess.
Scenario-by-scenario responses:
Line leak or crack in the tubing: Clamp the line above (closer to the child’s body than) the damage. Cover the damaged area with sterile gauze and tape. Call your home-care nurse or clinic immediately. Do not attempt to repair the catheter yourself with household tape.
Cap falls off: Clamp the line immediately. Do not touch the open end of the catheter. Call your home-care nurse; they will replace the cap using sterile technique. If you cannot reach anyone and the line is open, cover the end with sterile gauze and go to the nearest emergency department.
Unable to flush (occlusion): Check clamps and kinks first. Do not force. Call the clinic for tPA orders if the line remains blocked after repositioning.
Suspected CLABSI (fever, chills, lethargy): Call your care team immediately. Follow their instructions, which will likely direct you to the ED for blood cultures.
Call 911 for: heavy bleeding that will not stop, a child who is unresponsive or extremely difficult to wake, signs of air embolism (sudden chest pain, difficulty breathing, confusion after a line disconnection), or any situation where you feel the child’s life is in immediate danger.
Practice the clamp-and-call drill before discharge. Before your child comes home, ask the clinical team to walk you through the exact steps for a line emergency while you are still in the hospital. Muscle memory matters. Families who have practiced this scenario once handle real emergencies far more calmly than those who read about it for the first time in a crisis.
Supplies you should have at home and how to organize them
Keep two kits: a main supply kit stored at home and a small portable emergency kit that travels with your child.
Main home supply kit:
10 mL syringes (never smaller)
Normal saline flush vials or prefilled syringes (per your team’s order)
Heparin lock solution (if ordered)
CHG-alcohol wipes or CHG applicators
Sterile transparent dressings (Tegaderm or equivalent)
Sterile gauze pads
Medical tape
Needleless connectors (caps), quantity per your change schedule
Clean gloves (non-sterile, correct size for the caregiver)
Masks
Alcohol wipes (70% isopropyl)
Sharps disposal container
Portable emergency kit (keep in the diaper bag, backpack, or car):
At least two sterile clamps
Two spare needleless caps
Sterile gauze and tape
Two pairs of gloves
Two 10 mL syringes with saline flush
Written emergency contacts and line information card
Organization tips: Store supplies in a clean, dry container away from direct sunlight and humidity (not the bathroom). Check expiration dates monthly. Order refills at least one week before you expect to run out; home-care pharmacies often need 2–3 business days for processing. Ask your home-care agency or hospital discharge coordinator whether they provide a printed checklist or a supply-ordering schedule. Cincinnati Children’s recommends keeping a printed quick-reference card near the line supplies at all times.
Becoming confident: training, competency checks, and documentation
Before your child is discharged, you must perform a return demonstration in front of the clinical team. This is not optional, and it is not a formality. It is the single most reliable way to catch gaps before they become problems at home.
What return demonstration typically covers:
Dressing change from start to finish
Flushing and locking the line
Scrub-the-hub technique and timing
Emergency response: clamp-and-call drill
Recognizing infection signs and knowing when to call vs. go to the ED
What to document at every care episode:
Date and time of care
Who performed it (you, the home-care nurse, another trained caregiver)
Flush solution, volume, and any resistance noted
Appearance of the exit site and dressing
Any problems encountered and how they were handled
This log protects your child. If a complication develops, the care team can review exactly what happened and when. It also supports billing documentation for home-care nursing services.
When to request retraining: If a new caregiver joins the household, if you feel uncertain after a gap in performing care, or if your child’s line type changes, request a retraining visit from your home-care nurse before resuming independent care. For families in Georgia, in-home pediatric nursing support through a program like Opulentprivatecare can provide scheduled competency reinforcement visits so you are never left managing a complex skill alone.
A broader guide to managing complex pediatric medical needs at home covers documentation, caregiver roles, and how to coordinate between multiple providers.
When the line is removed and what long-term management looks like
The line comes out when it is no longer clinically necessary, or when a complication makes keeping it in place riskier than removing it.
Common clinical reasons for removal:
Treatment is complete (IV antibiotics, chemotherapy, TPN course finished)
Unresolvable infection despite antibiotic therapy
Catheter fracture or damage that cannot be repaired
Persistent occlusion that does not respond to tPA
Line no longer needed for the child’s current care plan
Long-term management for children who keep their line for months or years:
Maintain the weekly dressing schedule without skipping
Follow the flush and lock schedule precisely; gaps create clot risk
Attend every scheduled clinic visit for line assessment
For children with recurrent CLABSI, the 2022 SHEA/IDSA update recommends considering antimicrobial lock therapy or antimicrobial-impregnated catheters in selected high-risk cases. This is a specialist decision, not something families initiate independently.
Removal day: The procedure itself is usually brief and performed in a clinic or procedure room. For tunneled CVCs and ports, a minor surgical procedure under sedation is typically required. Plan for your child to avoid strenuous activity and submersion in water for a short period afterward (your team will specify the exact timeframe). Follow-up imaging or a wound check may be scheduled within a week.
What the guidelines say: CDC, APIC, SHEA, and AHRQ recommendations
The core prevention message across every major guideline is consistent: hand hygiene, hub care, dressing maintenance, and regular review of whether the line is still needed.
Key recommendations families should know:
The CDC identifies hand hygiene and aseptic technique as the foundation of CLABSI prevention for both clinical staff and home caregivers
The AHRQ recommends standardized daily maintenance checklists and cleaning injection ports with 70% alcohol or an iodophor before every access
APIC (Association for Professionals in Infection Control and Epidemiology) supports bundle-based care and caregiver education as core components of CLABSI reduction programs
The SHEA/IDSA 2022 update classifies essential prevention strategies (hand hygiene, hub care, dressing changes, line necessity review) as the baseline for all settings, with antimicrobial catheters and lock therapy reserved for high-risk cases
The AHRQ also supports care bundle implementation with feedback as an evidence-based strategy specifically in pediatric populations
Pediatric-specific nuance: CHG bathing is a common prevention strategy in adult ICUs, but its use in infants under two months or under 28 weeks gestational age requires caution due to skin absorption risk. Always confirm with your child’s team before using CHG products on very young infants.
Share these sources with your home-care team: The CDC’s CLABSI toolkit, the AHRQ best-practices document, and the SHEA/IDSA 2022 guidelines are all publicly available and written for clinical teams. If your home-care agency does not already follow a standardized bundle, these documents give your team a concrete framework to adopt.
What caregivers actually go through, and why practice is the answer
Managing a central line at home is genuinely hard at first. The first dressing change alone can feel like defusing a bomb while your child squirms. That anxiety is normal, and it does not mean you are doing it wrong.
What changes over time is not the complexity of the task. It is your confidence in your own hands. Families who practice return demonstrations before discharge, who ask every question that occurs to them, and who call the clinic when something looks off rather than waiting, consistently manage these lines safely. The parents who struggle most are the ones who felt too embarrassed to ask for a second demonstration or who assumed they would figure it out once they got home.
Most families reach a point where the weekly dressing change and daily flush become as routine as giving a medication. Normal activities, school, and even travel become manageable with the right safety steps in place. If your confidence is low or a new caregiver needs training, a home-care nurse visit is the right call, not a sign of failure. Opulentprivatecare’s in-home nursing model is built specifically for families in this situation.
Opulentprivatecare: in-home pediatric nursing for central line families in Georgia
Families managing a child’s central line at home often need more than a discharge packet. They need a skilled nurse who shows up consistently, knows their child’s line, and can step in when a dressing change goes wrong or a caregiver needs a competency refresher.
Opulentprivatecare provides in-home pediatric skilled nursing across Georgia for medically fragile children, including those with central lines, feeding tubes, trachs, and vents. The “3 Thumbs Up Rule” means care only starts when the family, the nurse, and Opulentprivatecare all agree it is the right fit. No rotating staff. No strangers at the door every week.
For central-line families specifically, Opulentprivatecare’s nurses can provide:
Scheduled dressing changes and flush support performed by a consistent, matched nurse
Caregiver retraining visits when a new family member takes over care
Medicaid and GAPP program paperwork assistance so families focus on care, not billing
Supply coordination support and documentation review
Continuity of care so the nurse who visits week one is the same nurse who visits month six
Georgia families who want to learn whether their child qualifies for in-home nursing support can start the intake process at Opulentprivatecare today.
Sources
The sources below are the primary guidelines and patient-education pages referenced throughout this guide. Share them with your home-care team if you need institutional-level documentation to support your care plan.
If your home-care agency or clinic does not already use a standardized maintenance checklist, the AHRQ and CDC documents above give them a ready-made framework. Printing the relevant pages and bringing them to your next clinic visit is a reasonable and welcomed step.
This article is general information, not a substitute for advice from a qualified doctor. Consult a qualified healthcare professional about your own circumstances before acting on anything here.
Recommended
Comments